
You'll be up and running with a working integration to our APIs before you can say "7 in 1 Spend Management".
Introduction
After following this guide, you should be able to make API requests to authenticate and retrieve your wallet summary.
📏 The technical complexity of this task is minimal and an effort has been made to simplify things, but some programming and API knowledge is recommended with the ability to understand Javascript.
Authentication
This guide requires access to our APIs. If you're a customer or partner looking for access:
- Customers - contact your success manager (CSM)
- Partners - contact the Spendesk partnerships team
Guide
1. Setup
This guide assumes you are familiar with Javascript and have a working runtime environment with npm (node package manager). We'll also be importing fastify to spin up a demo app environment.
Existing environment
If you're just looking to grab some code examples you can copy into an existing environment, rather than following our example project from scratch, skip to section 2.
To create an empty hello world project run:
npm init
Follow the setup instructions (leaving most things to default as per your preferences).
Then install fastify:
npm install fastify
Finally, add a file index.js with the following content which starts up a basic 'hello world' web server:
const fastify = require('fastify');
const app = fastify({ logger: true });
const port = 3000;

// serve up a default hello world response
app.get('/', (req, res) => {
  res.send('Hello World!')
});

app.listen({ port }, (error, address) => {
  if (error) {
  	throw error;
  }
  console.log(`Example app listening on address ${address}`)
});
To run the app, enter:
node index.js
And navigate to https://localhost:3000 to see your basic app.
2. Making a request
There are two parts to the request flow when using the Spendesk API;
- Authenticate to request an access token using the authentication endpoint
- Subsequent requests to other endpoints, such as for wallet summary
2.1 Authentication
There are two ways to authenticate with our API;
- API Key - using your API Key id / secret to request an access token
- OAuth2 - using the OAuth2 client credentials flow to generate an access token
For the purposes of this quickstart guide we'll be going with the simpler flow (API Keys). Please refer to our page on Authentication for more in-depth details.
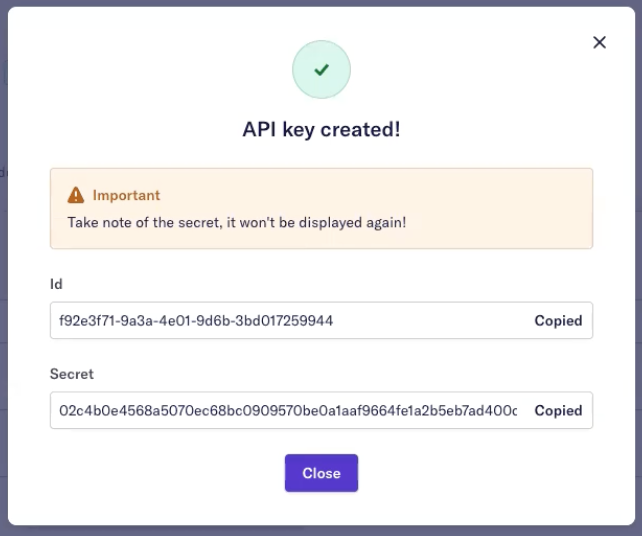
First, you'll make a call to /auth/token using your client id and secret. Account owners and admins can generate a client ID and secret in their Spendesk account on the Settings>Integrations>Manage API access screen:
You'll need to combine them into a single string in the format id:secret (i.e. adding a colon between id and secret with no spaces) then base64 encode the result. You'll end up with something like:
- plain text:
my_id:my_secret - encoded:
bXlfaWQ6bXlfc2VjcmV0
Then you're ready to make a call to authenticate using that encoded value in Authorization header with the prefix Basic:
// POST /auth/token

const options = {
  method: 'POST',
  headers: {
    Authorization: 'Basic bXlfaWQ6bXlfc2VjcmV0',
  },
};

//Production Base URL: https://public-api.spendesk.com
fetch('https://public-api.demo.spendesk.com/v1/auth/token', options)
  .then(response => console.log(response.json()))
  .catch(err => console.error(err));
{
  "access_token": "<your_access_token>",
  "token_type": "Bearer",
}
// Returns bXlfaWQ6bXlfc2VjcmV0
const encoded = Buffer.from('my_id:my_secret').toString('base64');
Your response, as shown in the example response tab above, will contain your access_token. We're just logging it to the console for now, so make a note of this for future calls and let's move onto the good stuff!
2.2 Getting Wallet Summary
Using your access token as the new value for the Authorization header (this time with the prefix Bearer), your next step is to make a request to the endpoint you want to use. In this case, we're looking at the /wallet-summary endpoint.
// GET /wallet-summary

const options = {
  method: 'POST',
  headers: {
    Authorization: 'Bearer <your_access_token>',
  },
};

//Production Base URL: https://public-api.spendesk.com
fetch('https://public-api.demo.spendesk.com/v1/wallet-summary', options)
  .then(response => console.log(response.json()))
  .catch(err => console.error(err));
{
  "id": "olal1n9o5bsbyb",
  "name": "Advanced Consulting",
  "status": "active",
  "currency": "EUR",
  "totalAmount": 1000000,
  "totalAvailableAmount": 578567,
  "totalAllocatedAmount": 421433,
  "allocatedOnCards": {
    "subscriptionAmount": 300200,
    "physicalAmount": 0,
    "singlePurchaseAmount": 121233,
    "totalAllocatedAmount": 421433
  },
  "scheduledTransfersAmount": {
    "scheduledExpenseClaimsAmount": 0,
    "scheduledInvoicesAmount": 0,
    "totalScheduledTransferAmount": 0
  }
}
Voila! From a connection and request perspective, you have now successfully made a request to our APIs for some data, though we're just logging it to console for now!
If you're just implementing this into an existing project, you can stop here. Otherwise, let's go one step further and display this on screen so we can see the full end-to-end.
3. Displaying the response
Now that we have a working request, let's put it all together in our example project with the following additions:
- some async / await code to handle the responses in sequence
- some response checking to ensure we successfully authenticated and got an access code
- displaying the wallet-summary response one screen
See the following for the full example file:
const fastify = require('fastify');
const app = fastify({ logger: true });
const port = 3000;

const id = '<your_client_id>';
const secret = '<your_secret>';

// start the fastify server
app.listen({ port }, (error, address) => {
  if (error) {
  	throw error;
  }
  console.log(`Example app listening on address ${address}`)
});

// trigger our code when browsing to the root '/'
app.get('/', async (req, res) => {

  // get the token
  const tokenResponse = await getToken(id, secret);
  // check that we succeed, if not just display the error
  if (!tokenResponse.ok)
    res.send("Error " + tokenResponse.status);

  const token = tokenResponse.json().access_token;

  // use the token to get wallet summary
  const walletSummaryResponse = await getWalletSummary(token);
  res.send(walletSummaryResponse.json());

  // we could continue using the same token for other requests, such as to /settlements
});

// Makes a POST request to /auth/token with the given id and secret
// returns a Promise of the access token
async function getToken(id, secret) {

  // base64 encode the id and secret
  const encoded = Buffer.from(id + ':' + secret).toString('base64');

  const options = {
    method: 'POST',
    headers: {
      Authorization: 'Bearer ' + encoded,
    },
  };

  //Production Base URL: https://public-api.spendesk.com
  return fetch('https://public-api.demo.spendesk.com/v1/auth/token', options);
}

// Makes a GET request to /wallet-summary using the access code
// returns a Promise for the wallet-summary data
async function getWalletSummary(accessCode) {
  const options = {
    method: 'GET',
    headers: {
      Authorization: 'Bearer ' + accessCode,
    },
  };

  //Production Base URL: https://public-api.spendesk.com
  return fetch('https://public-api.demo.spendesk.com/v1/wallet-summary', options);
}
Run node index.js and navigate to https://localhost:3000 and you should see your wallet summary data on screen.
For information on the token lifetime and how to handle expiry, see our documentation on authentication.
Quickstart complete!
Well done, you've learned how to authenticate with our API, make a request to our /wallet-summary endpoint and display some of the data.